Software Documentation Kit

Feed Rss

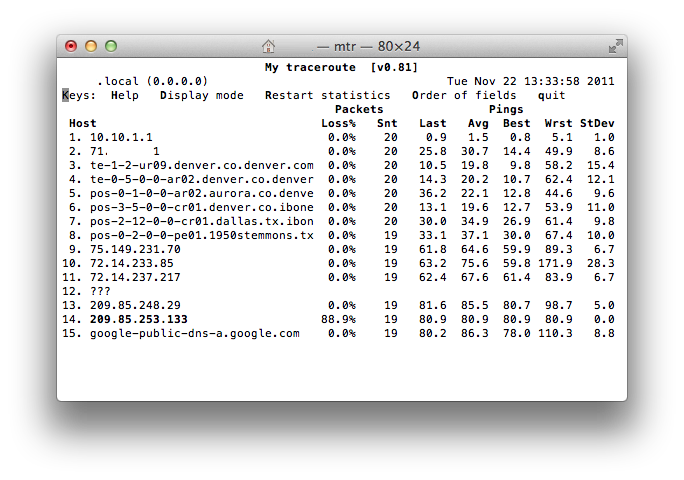
If you liked using WinMTR on Windows machines to troubleshoot network connections and latency and looking for a similar tool on a Mac OS X there is an app for that.

It’s called MTR, written by Matt Kimball. MTR stands for Matt TraceRoute or My TraceRoute whichever works for you.

On your Mac, start by downloading latest version from this FTP resource (scroll to the end and download .tar.gz file):

ftp://ftp.bitwizard.nl/mtr/

To unpack it, double click on the file in Finder. Assuming it’s in ~Downloads folder, open Terminal and type the following:

cd Downloads
cd mtr-0.81
export LIBS='-lm -ltermcap -lresolv'
./configure
make
sudo make install
alias mtr=/usr/local/sbin/mtr

To permanently save the alias, run this:

open ~/.bash_profile

add to the file:

alias mtr=/usr/local/sbin/mtr

Now to use it, open Terminal and type mtr with IP address:

mtr 8.8.8.8

Enjoy

How To Install NANO Editor on FreeBSD

09.18.2011, Comments Off, Tutorial, Unix, by .

This is a quick tutorial on how to install Nano Editor on FreeBSD UNIX. If you got used to pico or nano editor and just installed FreeBSD, in my example FreeBSD 8.2 – RELEASE version, you will find out that if you try to run nano you will get an error that it’s not found.

Make sure you are logged in as root and follow these few steps to install nano and make it work.

portsnap fetch update
cd /usr/ports/editors/nano
make install clean
ln -s /usr/local/bin/nano /usr/bin/nano

If you are using a non-default installation such as the one on Amazon AWS, it might not have the /usr/ports folder, you can just run “portsnap fetch extract update” and try the above steps again or download the package (port) directly:

pkg_add -r nano
ln -s /usr/local/bin/nano /usr/bin/nano

This is it. You can now run nano and it will work the usual way.
If you have any questions, comments or suggestions please post below.

If you planned to install a CentOS server, but mistakenly also installed Desktop Environment such as GNOME, you can easily remove the GUI packages and return back to Command Line (CLI).

There are two ways to do that. You can simply disable GUI or completely uninstall it. I will provide steps to do both.

Disable GUI (GDM)

nano /etc/inittab

change id:5:initdefault: to id:3:initdefault:

Remove GUI

If you want to remove all GUI packages completely, please still use the disable GUI steps first otherwise once Gnome, GDM, X Windows removed CentOS will still try to load X Window.

To remove GUI packages follow the steps:

yum groupremove "GNOME Desktop Environment" -y
yum groupremove "X Window System" -y

If you want to temporarily stop GDM (GUI), you can issue this command:

init 3

and then back to start GDM:

init 5

If you have any questions please post in comments.

If you are a cPanel user on CentOS 5.6 64 bit and wanting to install Subversion, you might get this error after running ‘yum install subversion’

Missing Dependency: perl(URI) >= 1.17 is needed by package subversion-1.6.11-7.el5_6.4.x86_64

yum seems to unable to find needed dependency and just fails

To fix this issue there’s a workaround.

cd /tmp
wget http://sdkit.com/download/centos/5/rpms/perl-URI-1.35-3.noarch.rpm
rpm -i perl-URI-1.35-3.noarch.rpm

The dependency is now fixed. You can proceed to installing subversion by running:

yum install subversion

If you like many experiencing an issue while installing Xcode 4 on Mac OS X Lion where it gets stuck at the very end at 98%-99% and seems like most packages installed but Xcode alias was not created in the Applications folder, there’s a solution for that.

First of all the initial issue was with being unable to quit iTunesHelper process and Apple tried fixing it releasing Xcode 4.0.1 update to the App Store, but that did not resolve the issue to most users even if one manually kills the process via Activity Monitor (Task Manager).

Second, before proceeding with the installation that works, let’s uninstall any previous versions of xcode or orphan dev packages by running this command:

sudo /Developer/Library/uninstall-devtools --mode=all

Once everything is removed, empty Trash and Restart your Mac. You can clean the dishes as well while Mac OS X is being restarted.

Now to install Xcode without hanging or giving errors, assuming you have downloaded version 4.0.1 from the App Store, you can find “Install Xcode” icon in your Applications folder.

Right click on the “Install Xcode” and click “Show Package Contents”

Then navigate to Contents > Resources > Xcode.mpkg and double-click on it.

Next follow the installer prompts to proceed with the installation of Xcode

Once the installation is successfully complete, you can close the installer and enjoy developing your Apps.

If you have any questions or comments, please post them below.